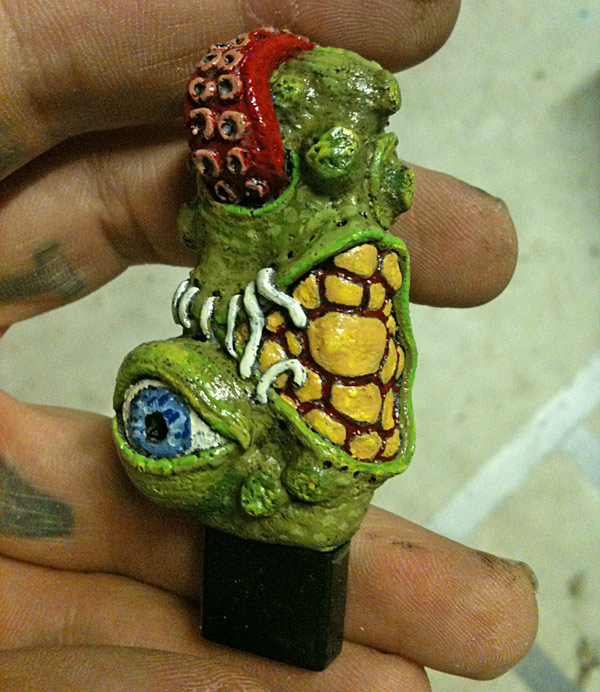
One of my recent projects was/is making a series of USB memory sticks. I sculpted the original from polymer clay, took a silicone mold, and can now “mass produce” them. Here’s what I made, and if you keep reading after the break there are lots more photos and a how-to series walking through all the steps it took to make this. It’s a pretty forgiving process and I actually think that this could be a good first project and introduction to casting for someone who’s new to the hobby and wants to get their feet wet.
But yeah, here’s a final product:

Ok… now for the “how to” I promised!
The first thing that you have to do is sculpt your original (although there’s nothing stopping you from using an existing toy or other object). I made mine out of a mix of Apoxie clay and Milliput, which are two-part polymer clays that harden without having to be baked like Fimo or Sclupey.
The only condition about what you make is that it has to be big enough to fit the USB stick (so if you can, just create it over an actual stick or a piece of wood or clay that’s the same size). I bought a dozen cheap 8gig sticks for about ten dollars each, in a slimline case that gave me decent freedom of design. The easiest thing to do is just sculpt over top of one of the sticks, which is what I did, but over a removable “sleeve” so I wouldn’t have to sacrifice the stick used in making the prototype. I forgot to take a decent picture of it, but here’s what it looked like:

If you want it to look “professional”, take a lot of time sanding it and making it “perfect”. The more complex your design is, the harder this will be to achieve, if that’s important to you, and the more likely that it will look “homemade”. This is the stage that you should invest the most effort into because anything you do here will become set in stone. Also realize that some complex shapes, especially things like overhangs and tunnels, can be difficult or impossible to capture in a simple two-part mold. In most cases a simpler design will turn out better. I’m happy with my end result, but in hindsight I probably should have kept my design a little simpler.
Once the sculpting was all done, I sprayed the prototype with mold release. To make the two-part mold I used silicone putty, which is a two part silicone with about the consistency of silly putty that hardens very quickly — about fifteen minutes (versus liquid silicone which takes a day to cure fully, and is much more susceptible to bubbles). To prepare it you mix equal parts of the two halves and thoroughly knead it. Then firmly press it onto the one half of the master so that the edges of the silicone hit the halfway point at an approximately perpendicular angle, making sure that it’s a tight fit and there are no bubbles or gaps. After this hardens, leave it in place and spray it with mold release and then mix up some more putty. Then cap it off, making the other half of the mold. Press firmly to ensure there are no gaps or bubbles, and shape it so that it can stand upright with the port end of the USB stick exposed. After the second half hardens, open it up and take out the original. It should look a little like this:
![]()
On the right of the mold you can see what the USB sticks I used look like.
To actually make the stick, I lightly sprayed the mold with mold release (although I think that with silicone molds it may not be needed and can cause problems as you’ll see in a moment) and then closed it up and wrapped it with duct tape to hold it together firmly. If you’ve made the mold right, you should be able to slide the USB stick into the mold and have it be held in place by the silicone. Making the plastic is a simple process similar to making the silicone putty — its two halves are mixed 50/50. The easiest way to do this is with a scale (my stick needs about 50g of plastic if I remember correctly) but it’s not necessary. After mixing the resin pour it into the mold. Wear gloves while you’re doing this as it’s no fun getting plastic all over your hands. After the mold is full of liquid plastic, push the USB stick into the mold. This will displace some plastic, which will flow out the top, so make sure that the stick is solidly capped because if plastic hardens over the plug, it will be useless.

Depending on the plastic, it will harden and cure over the next ten or twenty minutes, after which you can open the mold and pop out your product. Here’s the first two I made. The reason that they’re different colours is because they’re made with different plastics. You may also notice that the one on the left is full of bubbles like an Aero chocolate bar. I think this is because I sprayed in too much mold release and/or did not allow the release to dry. With that in mind, if you’re new at this, it might be worth casting a few without the USB sticks to get practice. I probably should have done that.

The other problem you may see is that the very top of the mold had an air bubble so there is a gap. To make matters worse, I didn’t quite push the stick in far enough, making that gap a millimeter or two more. After trimming the excess plastic with a hobby blade, I used a last bit of Milliput clay to fill in that space and make a nice cap for the stick. The Milliput hardens to a plastic that’s almost identical so it’s ideal for this purpose. At that point, the manufacturing phase was complete.

All that was left at this point was to paint it — although depending on what you’re making, you may not need to do this, and if you are doing something that can be a single colour, the plastic can be dyed in the casting process, or you can “dust” the inside of the mold with a metallic powder to make it look like bronze or gold or steel or whatever. In my case, I painted it with vinyl acrylic paints by Vallejo, the sort that are used to paint fantasy miniatures. After painting I sprayed it with three or four layers of automotive clearcoat to protect it. Here are some more pictures of how it turned out:


Anyway… It really is a very easy project and lots of fun. The other thing I should mention is that the silicone molds tend to be food safe, so if you get bored of making USB sticks, there’s no reason why you can’t switch gears and cast some chocolates or candies instead.
PS. I know, I still need to make a custom cap to go with it!


One Comment
Very creative and fun!
I love when people take the most simplest products/items and turn them into something really cool.
Post a Comment